How to Balance Your Turntable's Tonearm Without the Guesswork

You've just brought home a gorgeous Technics SL-1200 or maybe a vintage Thorens TD-160 from the local hi-fi shop. The platter spins beautifully, the dust cover gleams, and you can't wait to drop the needle on that original pressing of Dark Side of the Moon you found last weekend. But when you lower the cueing lever, the tonearm drifts sideways like it's got somewhere else to be—or worse, the stylus hits the record with a worrying thud that makes your stomach drop. That's when you realize setup isn't quite as plug-and-play as you'd hoped.
Proper tonearm balance isn't just audiophile fussiness. It's the difference between hearing every detail in your vinyl and slowly sandblasting your record grooves into oblivion. An improperly balanced arm either tracks too light (causing distortion, skipping, and premature stylus wear) or too heavy (damaging both your records and the cartridge itself). The good news? You don't need a degree in mechanical engineering to get this right. You just need patience, a few inexpensive tools, and about twenty minutes of uninterrupted time.
What Tools Do You Actually Need to Balance a Tonearm?
Before you start twiddling knobs, gather your supplies. You'll need a tracking force gauge (digital is more precise, but a quality analog beam scale works fine), your turntable's manual (seriously—different manufacturers use different counterweight threading and anti-skate mechanisms), and the cartridge manufacturer's recommended tracking force range. That last piece of information is usually printed on the cartridge itself or available on the manufacturer's website.
If you don't own a tracking force gauge yet, the Shure SFG-2 has been a vinyl community staple for decades, though digital alternatives from brands like Ortofon or Rega offer easier readability. Expect to spend between $15 and $80 depending on your precision requirements. While you're at it, grab a stylus force tracking scale—some gauges combine both functions, which is handy if you switch cartridges frequently.
One more thing: work on a level surface. An uneven table will throw off your entire calibration. Use your phone's level app or a small bubble level to check the platter surface before you begin. This matters more than most beginners realize.
How Do You Set the Tonearm to Float Perfectly?
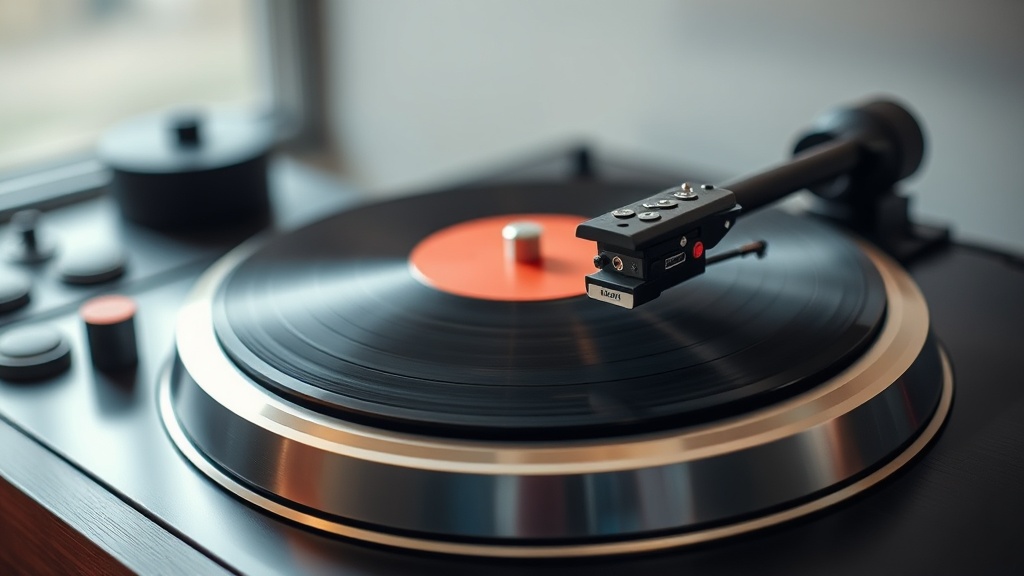
Start by removing any protective stylus guard (you'd be surprised how many people skip this and wonder why nothing works). Now, locate the counterweight at the back of your tonearm. You'll be rotating it to adjust how heavily the cartridge sits on the record—but first, you need to find "zero balance," the point where the arm floats perfectly level without touching the platter.
Gently lift the tonearm and position it over the record spindle area. Unlock the arm restraint if there is one. Now rotate the counterweight until the arm starts to float freely—neither rising up nor dropping down. At this neutral point, the stylus should hover just above the record surface without touching it. The arm should feel almost weightless when you gently guide it with your finger.
Once you've achieved this floating balance, hold the counterweight steady and rotate the numbered dial (the tracking force indicator ring) until the zero lines up with the reference line on your tonearm. This zeroes out your scale without moving the actual weight position. You're now ready to dial in proper tracking force.
Rotate the entire counterweight assembly (not just the dial this time) to add the recommended grams. If your cartridge manufacturer suggests 1.8 to 2.2 grams, start at the lower end—say, 1.8 grams—and test from there. Verify your setting with the tracking force gauge, placing it on the platter and gently lowering the stylus onto its measuring platform. Digital gauges typically give you a direct reading; beam scales require you to read where the stylus pushes the indicator.
What Is Anti-Skate and Why Does It Matter?
Here's where many collectors stop—and it's a mistake. The inward pulling force created by record grooves and tonearm geometry means your stylus doesn't track straight down the middle of the groove. Instead, it's constantly being pulled toward the center of the record. Without compensation, the inner groove wall bears all the force while the outer wall gets virtually no contact. Your records wear unevenly, stereo balance suffers, and distortion creeps in.
Anti-skate (sometimes labeled as bias or side-thrust compensation) counteracts this inward pull. The traditional rule of thumb is to set your anti-skate to match your tracking force—so if you're running 2.0 grams of downforce, dial in 2.0 on the anti-skate scale. But this is just a starting point.
For a more precise adjustment, use a test record with anti-skate tracking bands—the Analogue Productions test LPs include these, as do offerings from Fresk Records. These tracks contain blank grooves that should produce pure silence; if you hear distortion or the tonearm drifts noticeably, adjust anti-skate until the arm stays centered and the output is clean. No test record? Play a single-sided 45 with a wide dead wax area and listen for tonal balance between channels.
Some turntables use a hanging weight on a loop of fishing line for anti-skate (common on Rega and Pro-Ject models). Others use a spring-loaded dial. Linear tracking arms avoid this issue entirely through different geometry—but if you're reading this guide, you probably have a pivoting arm, which means anti-skate matters for your setup.
How Can You Tell If Your Tonearm Is Properly Balanced?
After setting tracking force and anti-skate, it's time to verify your work. Cue up a record you know well—something with dynamic range and strong bass content. Listen for distortion in the inner grooves (the last tracks on each side), where tracking errors become most obvious. Sibilance on vocals that sounds harsh or "spitty," particularly on the inner half of an LP, often indicates insufficient tracking force or incorrect anti-skate.
Watch the cartridge body as the record plays. Does it look centered in the headshell, or is it visibly tilted toward one side of the groove? A properly balanced arm keeps the cartridge essentially upright throughout the record's surface. You can also perform the "bounce test"—gently tap the headshell while a record plays. The stylus should track through minor vibrations without jumping. If it skips at the slightest touch, your tracking force is likely too light.
For the obsessively precise, Analog Magazine publishes detailed articles on advanced alignment techniques, including the use of protractors for cartridge alignment and more sophisticated tracking verification methods. Most collectors won't need this level of detail, but if you've invested in a high-end moving coil cartridge, the extra precision pays dividends.
Troubleshooting Common Balance Issues
If you've followed the steps but something still sounds off, check a few common culprits. First, verify that your headshell is properly seated and tightened—loose mounting can cause the cartridge to wobble independently of the arm. Second, examine your stylus for damage. A bent cantilever throws off all your careful calculations. Third, confirm that your platter is spinning at the correct speed; pitch variations can mimic tracking problems.
Older turntables with gimbal bearings may have developed sticky spots from years of disuse. If the arm doesn't move smoothly in both horizontal and vertical planes, it may need professional service. Don't force it—gimbal bearings are delicate and expensive to replace if damaged.
Finally, remember that different cartridges have different compliance specifications—that is, how stiff or flexible their suspension is. High-compliance cartridges (like many vintage Shure models) work best with lighter tonearms. Low-compliance moving coils typically prefer heavier arms. Mismatched compliance and effective mass creates resonance issues that no amount of tracking force adjustment will fix. If you're swapping cartridges between radically different designs, research compatibility before you start twisting knobs.
Take your time with this process. The twenty minutes you spend dialing in proper tonearm balance will save you hundreds of dollars in damaged records and extend the life of your stylus by thousands of hours. Plus, you'll finally hear what your collection actually sounds like—which, after all, is why you got into this hobby in the first place.