Finding High-Quality Replacement Cartridges for Vintage Turntables

The needle drops, the surface noise settles into a low hum, and then the first note hits—crisp, warm, and textured. But if that sound is muffled, thin, or physically skipping, your cartridge might be the culprit. This guide explains how to identify, select, and install a replacement cartridge for your vintage turntable to restore your music's original fidelity.
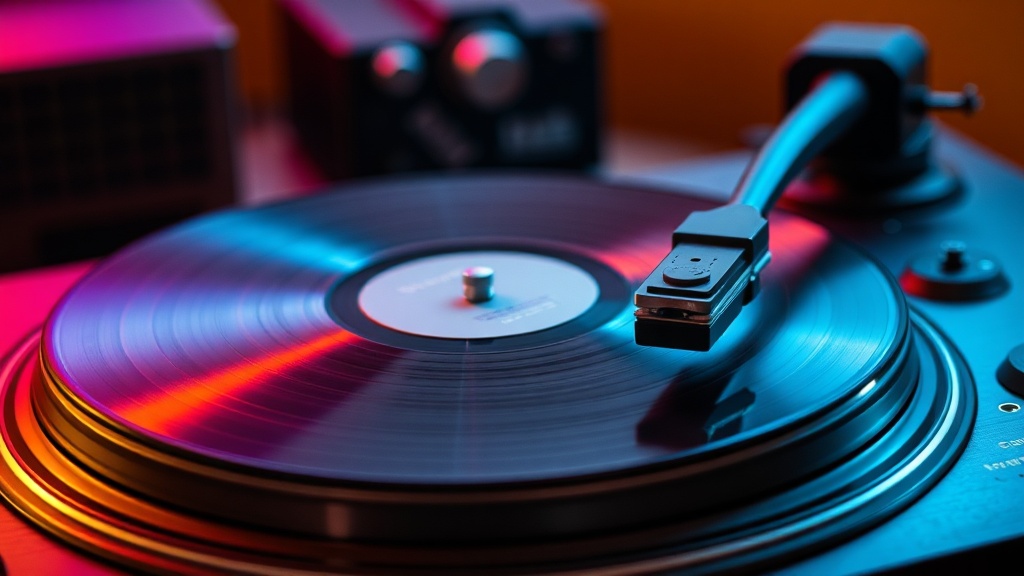
A cartridge is the heart of your record player. It converts the physical vibrations of the grooves into an electrical signal. When you're working with vintage gear—the kind of heavy, high-quality pieces from the 1970s—the original component might be worn out or simply outdated. Replacing it isn't just about fixing a broken part; it's about deciding how you want your music to sound.
What is a Good Replacement Cartridge for a Vintage Turntable?
A good replacement cartridge is one that matches the technical specifications of your specific turntable tonearm while delivering the sonic profile you prefer. There isn't one single "best" brand, but rather a best fit for your equipment. For example, if you have a vintage Technics SL-1200, you might want something that respects its high-performance heritage, whereas a mid-range Dual might only need a simple, reliable moving magnet cartridge.
Most vintage setups use Moving Magnet (MM) cartridges. These are the industry standard for home listening because they are easy to set up and relatively affordable. If you want to go a step up, you might look at Moving Coil (MC) cartridges, which offer incredible detail but require a specialized phono preamp to work.
Here are the three main categories you'll encounter:
- Moving Magnet (MM): Great for most people. They are durable and easy to replace. Brands like Audio-Technica and Ortofon make excellent MM options.
- Moving Coil (MC): High-end, high-detail, but more sensitive. You'll need a high-quality phono stage to hear the difference.
- Ceramic: Usually found in cheap, "all-in-one" suitcase players. If you have a vintage high-fidelity setup, you should move away from these immediately.
Don't forget that your stylus is just as important as the cartridge itself. If you don't clean your stylus weekly, even a brand-new cartridge won't sound the way it should. Dirt and buildup are the enemies of high fidelity.
How Do I Know Which Cartridge Fits My Turntable?
To ensure a perfect fit, you must match the cartridge's mounting style and the tonearm's compatibility with weight and tracking force. Most vintage turntables use a standard 1/2 inch mount or a three-screw mounting system. You can't just slap any cartridge onto any arm—it's a precision game.
Before you buy anything, check these three technical details:
- Mounting Type: Is it a standard 1/2 inch mount? Most modern high-end cartridges use this. If your vintage player uses a specific proprietary mount, you might need an adapter.
- Effective Mass: This is a big one. A heavy cartridge on a lightweight tonearm will cause tracking issues. If your arm is light, look for a cartridge with a lower effective mass to prevent the needle from bouncing.
- Tracking Force: This is how much pressure the needle applies to the record. A Shure cartridge from the 70s might have had a much higher recommended tracking force than a modern Ortofon 2M Red.
If you're still feeling a bit lost, I highly recommend looking at the Wikipedia entry on Phonographs to understand the basic physics of how these components interact. It helps to know the "why" behind the "how."
If you're still in the process of setting up your initial system, you might want to check out my previous post on how to choose your first vintage record player. The principles of compatibility apply whether you're upgrading or starting fresh.
How Much Does a Replacement Cartridge Cost?
Replacement cartridges typically cost anywhere from $30 to over $1,000, depending on whether you want a basic upgrade or a high-fidelity component. For most hobbyists, the "sweet spot" for a significant quality jump is in the $100 to $300 range.
| Tier | Price Range | Typical Brands | Best For... |
|---|---|---|---|
| Budget/Entry | $20 - $60 | Audio-Technica AT3600L | Basic vintage players and casual listening. |
| Mid-Range | $100 - $250 | Ortofon 2M Red, Nagaoka MP-110 | Serious collectors wanting a noticeable clarity jump. |
| High-End | $400 - $1,000+ | Denon, Audio-Technica VM series | Audiophiles with high-quality preamps. |
Worth noting: A cheaper cartridge isn't always a "bad" thing. Sometimes, a vintage-correct cartridge is exactly what your specific turntable was designed to use. For example, if you have a vintage Thorens, a specific high-compliance cartridge might actually perform better than a modern "high-output" one.
The catch? High-end cartridges often require more expensive accessories. If you buy a $600 Moving Coil cartridge but plug it into a $20 receiver with a basic phono stage, you're essentially throwing money away. The signal won't be processed correctly, and you'll miss the nuances you paid for.
Common Mistakes When Installing a New Cartridge
The most common mistake is failing to properly adjust the alignment and tracking force after installation. You can't just drop it in and play; you have to calibrate it. If you skip this, you risk damaging your records—and your new cartridge.
Here is a quick checklist for a successful installation:
- Check the Leads: Make sure the tiny colored wires (the leads) are securely attached to the cartridge pins. If they're loose, you'll get one-channel audio or total silence.
- Use a Digital Scale: Don't guess the weight. Use a digital stylus force gauge to ensure you're hitting the exact grams recommended by the manufacturer.
- The Alignment Check: Use a way to align the cartridge, like a Baerwald protractor. If the angle is off, you'll get inner-groove distortion, which sounds like a harsh, distorted mess during the last song on a side.
- Check the Ground Wire: While not part of the cartridge itself, a buzzing sound often points to a grounding issue in the turntable setup.
It's a bit of a meticulous process, I know. But taking twenty minutes to calibrate your gear properly will save you from the frustration of a "bad" sounding record that's actually just a poorly set-up needle. Precision matters.
If your setup feels a bit cramped and you're worried about vibration or feedback, you might find my post on why your speakers need space helpful. Proper placement of all your components is part of the same holistic approach to high-quality audio.
The beauty of vintage audio is that it's modular. You can start with a basic setup and slowly swap out parts as you learn more. A good cartridge is often the single biggest way to breathe life back into an old piece of gear that's been sitting in an attic for decades.